Old-Fashioned Peanut Butter Kiss Cookies (Easy Bisquick Recipe)
As an Amazon Associate and member of other affiliate programs, we earn from qualifying purchases.
If there’s one cookie that instantly takes me back to church bake sales, holiday tins, and well-worn recipe boxes, it’s peanut butter kiss cookies. This version is especially close to my heart because it’s made with simple pantry shortcuts, exactly how home cooks have been doing it for generations.

Ingredients for Peanut Butter Blossoms with Bisquick
This recipe comes together quickly thanks to Bisquick baking mix, making it perfect for busy days, last-minute guests, or when you just want something sweet without pulling out half the pantry. Soft, slightly chewy peanut butter cookies rolled in sugar and topped with a classic chocolate kiss, these are the kind of cookies that disappear fast.
- baking mix (such as Bisquick)
- sweetened condensed milk
- peanut butter
- vanilla extract
- white sugar (for rolling)
- chocolate candy kisses, unwrapped (or a Reese’s Heart or mini cup)

Peanut Butter Kiss Cookies
I need to take a second to thank Jennah. I don’t know you personally, but your recipe for Peanut Butter Blossoms with Bisquick have been a hit with my family and friends.
It all started when I bought several boxes of Jiffy Baking Mix on a huge discount at Kroger. I have a big issue with not being able to resist a good markdown deal at the grocery store. It must be a family trait because my other half of the blog, Megan, has the same genetic trait.
I had several of these said boxes of all purpose baking mix, and I didn’t know how I was going to use it.
After some searching, I discovered this easy recipe, and next thing you know, I’ve been making it monthly. My kids take them to school to share with friends and teachers, and they are a hit with everyone.

How to Make Peanut Butter Kiss Cookies
Step by Step Instructions
- Preheat oven to 350°F (175°C). Line a baking sheet with parchment paper or lightly grease it.
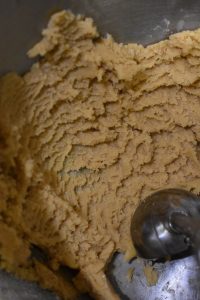
- In a large bowl, mix baking mix, sweetened condensed milk, peanut butter, and vanilla until well combined.
- Roll dough into 1-inch balls.
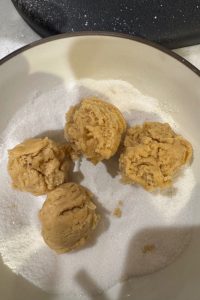
- Pour sugar onto a small plate and roll each dough ball in sugar until coated.
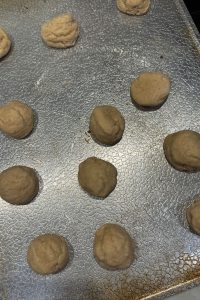
- Place cookies on prepared baking sheet, spacing slightly apart.
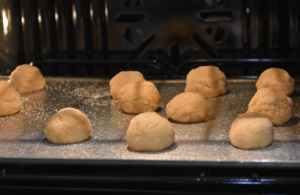
- Bake for about 8 minutes, until edges are just lightly golden.
- Remove from oven and immediately press one chocolate kiss into the center of each cookie.
- Transfer cookies to a wire rack and cool completely.
Storage & Freezing
- Freeze baked cookies for up to 2 months.
- Store in an airtight container at room temperature for up to 5 days.

Why You’ll Love These Peanut Butter Kiss Cookies
- Made with only a handful of ingredients
- Uses Bisquick for an easy shortcut
- Soft centers with lightly crisp edges
- Perfect for Christmas, Valentine’s Day, bake sales, and cookie trays
- Freezer-friendly and kid-approved
These are simple, nostalgic cookies just the way old cookbooks intended.

These Old Cookbook Tips & Variations
- Don’t overbake. These cookies should stay soft.
- If dough feels sticky, lightly butter your hands.
- Try dark chocolate or caramel kisses for variety.
- Use special shaped kiss candies like these hearts we used for the cutest Valentine cookies.
- For a holiday twist, roll in colored sanding sugar.
- Pancake mix works as a great substitution for baking mix.

Popular Questions About Peanut Butter Kiss Cookies
Can I make peanut butter kiss cookies with Bisquick?
Yes! Bisquick works beautifully in this recipe and saves time by replacing flour, baking powder, and salt.
Why are my peanut butter kiss cookies dry?
Overbaking is the most common cause. Pull them out as soon as the edges are lightly set. 8 minutes is usually perfect.
Can I use natural peanut butter?
It’s best to use regular creamy peanut butter. Natural peanut butter can make the dough too oily or crumbly.
Do I add the kisses before or after baking?
Always after baking. Pressing the kiss in while the cookie is hot helps it set without melting completely.
Can these cookies be made ahead?
Yes! The dough can be made a day ahead and refrigerated, or the cookies can be baked and frozen.

A Cookie Worth Keeping in the Recipe Box
This is the kind of recipe that deserves to be scribbled on a card, tucked into a cookbook, and made year after year. Simple ingredients, no fuss, and guaranteed smiles just like the recipes we grew up with.
If you love easy, nostalgic desserts, be sure to browse more favorites from These Old Cookbooks. These Old-Fashioned Peanut Blossoms are another take on these cookies.
Nostalgic Cookie Recipes
We love a classic cookie, like these Peanut Butter Kiss Cookies, and we have several favorites on the blog. We also love these Oatmeal Butterscotch Cookies from Farmwife Cooks.



Old-Fashioned Peanut Butter Kiss Cookies (Easy Bisquick Recipe)
Ingredients
- 2 cups baking mix such as Bisquick
- 14 ounces sweetened condensed milk 14-ounce can
- ¾ cup peanut butter
- 1 teaspoon vanilla extract
- ¼ cup white sugar for rolling
- 30 milk chocolate candy kisses unwrapped
Instructions
- Preheat oven to 350°F (175°C).
- In a large bowl, mix baking mix, sweetened condensed milk, peanut butter, and vanilla until well combined. I often use a mixer but it can be done by-hand.

- Roll dough into 1-inch balls.
- Pour sugar onto a small plate and roll each dough ball in sugar until coated.
- Place cookies on prepared baking sheet, spacing slightly apart.
- Bake for about 8 minutes, until edges are just lightly golden.

- Remove from oven and immediately press one chocolate kiss into the center of each cookie. Let cool on the pan for several minutes to let the cookies set up.
- Transfer cookies to a wire rack and cool completely.

Notes
- Don’t overbake. These cookies should stay soft.
- If dough feels sticky, lightly butter your hands.
- Try dark chocolate or caramel kisses for variety.
- Use special shaped kiss candies like these hearts for the cutest Valentine cookies.
- For a holiday twist, roll in colored sanding sugar.
- Pancake mix works as a great substitution for baking mix.
- The nutritional information is auto-calculated and can vary depending on the products used.
Nutrition